
Brio’s LinkedIn messaging extension is designed to streamline professional conversations by integrating AI-powered assistance directly into your LinkedIn inbox. Whether you’re a recruiter guiding passive candidates or a business developer prospecting new clients, Brio helps you personalize outreach, track engagement, and optimize conversations for strategic outcomes.
To get started with Brio, follow this detailed guide on downloading the extension, setting it up, and configuring it for your specific engagement needs.
Downloading and Installing the Extension
Step 1: Check Browser Compatibility
Brio is currently optimized for Google Chrome, Brave Browser, Microsoft Edge, Opera, Vivaldi, and Arc Browser. Support for Firefox and Safari is planned for future releases. Before installing, ensure you are using one of these browsers. We recommend updating to the latest version for best performance.
Step 2: Access the Brio Extension Page
- Visit the Brio website or the official Chrome Web Store listing.
- Search for “Brio LinkedIn Messaging Extension” or use the direct link provided in your onboarding email or admin portal.
Step 3: Install the Extension
- Click the Add to Chrome or Add to Edge button.
- Confirm installation when prompted.
- Once installed, the Brio icon (an orange “B”) will appear in your browser toolbar.
Tip: If you don’t see the Brio icon, click the puzzle piece (Extensions icon) and pin it to the toolbar for easy access.
Step 4: Log Into Your Brio Account
- Click the Brio icon in the toolbar.
- Log in using the credentials provided during onboarding.
- If you haven’t created an account yet, follow the Sign Up link and complete registration.
Once logged in, Brio syncs with your LinkedIn tab and activates its messaging assistant inside your LinkedIn inbox interface.
Initial Configuration and Setup Steps
After installing the Brio extension, it’s time to configure your environment so Brio can provide context-aware, high-quality responses based on your role, messaging style, and business objectives.
This setup phase involves four primary areas:
- Account Preferences
- API Integration
- Engagement Profiles
- Data Management (Import/Export)
Let’s walk through each one in order.
1. Account Preferences
This section is where you define your identity, language preference, and communication style—critical for ensuring Brio tailors messaging that sounds like you.
To access it:
- Click the Brio icon
- Navigate to Settings → Account & Preferences
Here’s what to configure:
Full Name
This is the name Brio will use when closing messages (e.g., “Kind regards, Darius Kersulis”).
Email Address
Provide the email you want recipients to contact. Brio uses this in certain Call-to-Action (CTA) configurations (e.g., “Email me at darius@skillseek.eu”).
Language Preference
Choose your preferred language for Brio’s interface and for system-generated prompts (not for message replies—Brio detects recipient language automatically during messaging).
Communication Style
This is where Brio truly becomes personalized. Write a brief but expressive summary of how you like to communicate. For example:
“My communication style is persuasive yet personable, allowing me to quickly establish rapport and trust. I excel at identifying individual motivations and skillfully tailor my approach to resonate with each connection. My messages are authentic, confident, and refreshingly straightforward, effortlessly guiding conversations toward meaningful outcomes.”
Brio uses this input to shape tone, formality, structure, and emotional expression in all AI-generated responses.
Once filled, click Save Preferences.
2. API Integration
Brio supports multiple AI models and allows you to choose which one powers your engagement profile. This includes models like Grok, DeepSeek, OpenAI, and Google Gemini.
To configure API access:
- Go to Settings → API Integration
You’ll see a list of available integrations. If you were pre-onboarded by your admin or Brio team, your keys might already be set up. If not, you can add your own:
Add a New API
- Click + Add New API
- Choose a provider (e.g., OpenAI, Grok)
- Paste your API key securely
Once added, you’ll see each provider’s label and a partially redacted API key. You can always edit or delete them.
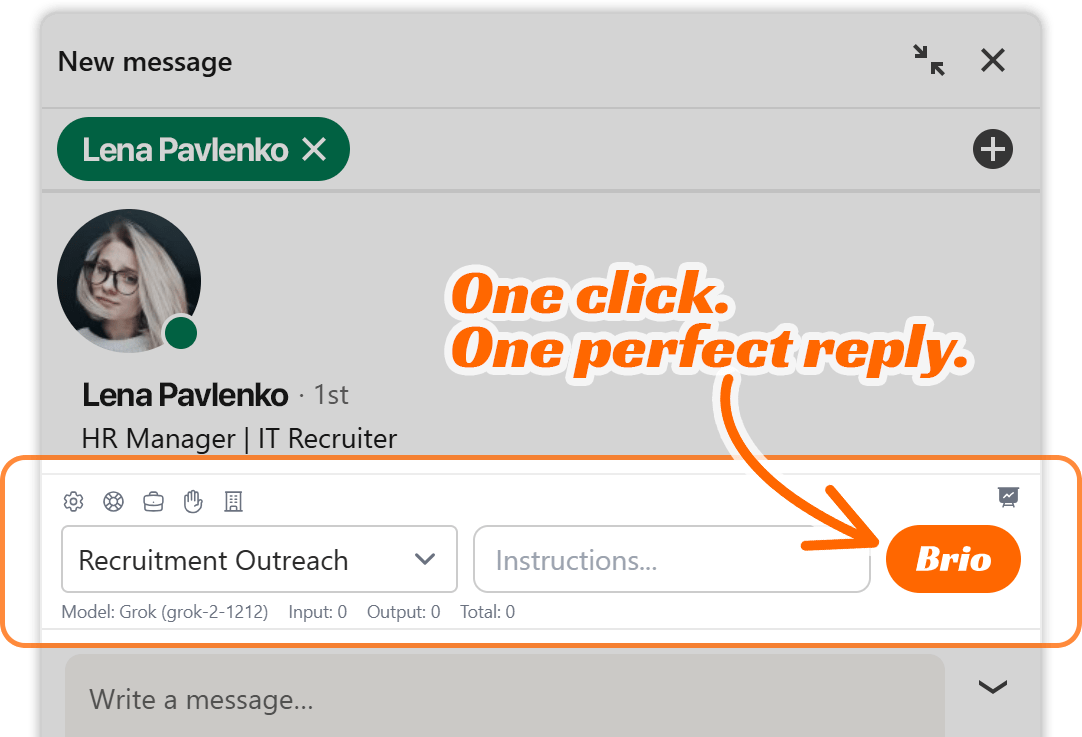
For example, in the Recruitment Outreach use case, the Grok-2-1212 model is selected for its balance between nuance, context awareness, and response fluidity.
Note: Brio does not send LinkedIn messages automatically. Instead, it generates message suggestions based on your API-selected model, which you review and send manually.
3. Engagement Profiles
Engagement Profiles are the heart of Brio’s contextual engine. Think of them as “AI personas” designed around specific tasks—like recruiting, sales outreach, or customer success.
To set one up:
- Navigate to Settings → Engagement Profiles
- Click + Add Engagement Profile
Example Profile: “Recruitment Outreach”
Here’s what a properly configured profile includes:
Profile Name
Give it a descriptive name like “Recruitment Outreach,” “Sales Prospecting,” or “Startup Hiring.”
Select API
Choose from the APIs you configured earlier. Example: Grok.
Select Model
Pick the specific model version. Example: Grok-2-1212 (Stable release).
Call-to-Action (CTA) Setup
These are the actionable links or contact options Brio can insert into your messages when relevant. CTAs are categorized as either web_url (links) or contact_email/contact_phone.
Click Add CTA, and enter:
- CTA Name (e.g., Learn about SkillSeek opportunity)
- CTA Value (e.g., https://skillseek.eu/for-recruiters/)
For best results, include a full CTA suite relevant to your workflow. For example:
- Learn about SkillSeek opportunity
https://skillseek.eu/for-recruiters/ - Learn about benefits of partnering
https://skillseek.eu/benefits-of-partnering/ - Become a SkillSeek recruiter
https://skillseek.eu/become-a-recruiter/ - Email me
darius@skillseek.eu - Call me
+123456789
Brio will analyze each CTA and map it to conversational scenarios using AI. When a recipient’s message includes relevant keywords or topics, Brio knows which CTA to insert based on relevance, tone, and strategic priority.
Sales Resources
These are content links Brio will analyze to extract factual data, concepts, methods, and real-world applications. Think of these as “teaching materials” Brio uses to become context-aware.
Click Add Resource, then input:
- Resource Name (e.g., Freelance Recruiting)
- Resource URL (e.g., https://skillseek.eu/for-recruiters/)
You’ll want to upload the same links as you did in the CTA section to maintain alignment.
Once added, Brio runs a 5-part analysis behind the scenes:
- Factual Data
- Key Concepts
- Approaches & Methods
- Contextual Background
- Practical Use Cases
This becomes part of Brio’s Business Overview, which guides how it crafts strategic replies.
Business Overview
This field auto-populates when Brio finishes analyzing your resources. It includes your platform details, payment structure, retention terms, and earning milestones. You can manually edit or add more notes if needed.
Click Generate Analysis if you update the resources and want to refresh the content.
Finally, click Save Profile.
Your Engagement Profile is now ready for use, and you’ll see it appear in the dropdown menu inside LinkedIn messaging.
4. Data Management
This section lets you export your entire Brio setup or import configurations to another browser or user.
Navigate to Settings → Data Management
You’ll see the following options:
Export Data
Check the boxes to include:
- API Integrations
- Engagement Profiles
- Account Preferences
- Analyses (Business Overview, CTA Analysis, etc.)
Click Export Selected Data to download a JSON configuration file.
Import Data
You can re-import saved profiles on a new machine or account.
- Click Choose File
- Upload your previously saved Brio config file
This saves time if you’re managing teams or switching devices and need a fast setup.
Final Check Before Messaging
Once all of the above steps are complete:
- Open your LinkedIn inbox
- You’ll see Brio loaded into your messaging panel
- Select the appropriate Engagement Profile from the dropdown
- Click Brio to start generating personalized replies based on conversation context
At this point, Brio is fully ready to assist you—analyzing LinkedIn conversations, detecting language and tone, referencing your business details, and guiding recipients to the most appropriate CTA with natural, human-sounding responses.