
Brio is a powerful AI assistant for LinkedIn messaging that helps professionals streamline their outreach and manage ongoing conversations. While Brio’s intelligent response generation is driven by sophisticated analysis, the quality and relevance of its output are largely determined by how well users configure its interface—specifically through the Engagement Profile and the Additional Instructions fields.
This section of the documentation serves as a quick reference to help you understand and master these two key fields. Whether you’re customizing Brio to reflect your unique business context or tailoring its responses for a specific audience segment, knowing how to properly use these inputs will elevate the effectiveness of every message you send.
Engagement Profiles Field
What is an Engagement Profile?
An Engagement Profile in Brio is a pre-configured environment that defines how Brio should behave when generating responses for a specific type of outreach. It encapsulates:
- AI model selection (e.g., Grok, OpenAI, DeepSeek, Gemini)
- Model version or release (e.g., Grok-2 1212 Stable)
- Business context (facts, features, pricing models, milestones)
- Call-to-Actions (CTAs) relevant to your outreach
- Sales resources and URLs Brio can learn from
- Strategic priorities (e.g., which CTA to promote more aggressively)
Each profile serves as a blueprint for Brio, providing the foundational knowledge and business goals required to generate responses that feel on-brand, relevant, and persuasive.
Where to Find It
You’ll find the Engagement Profiles field in two main locations:
- Brio Settings Panel > Engagement Profiles Tab
Here, you can create, edit, and delete profiles. You can define the full context, load CTAs, and provide business documentation for Brio to analyze. - LinkedIn Chat Window > Brio Toolbar
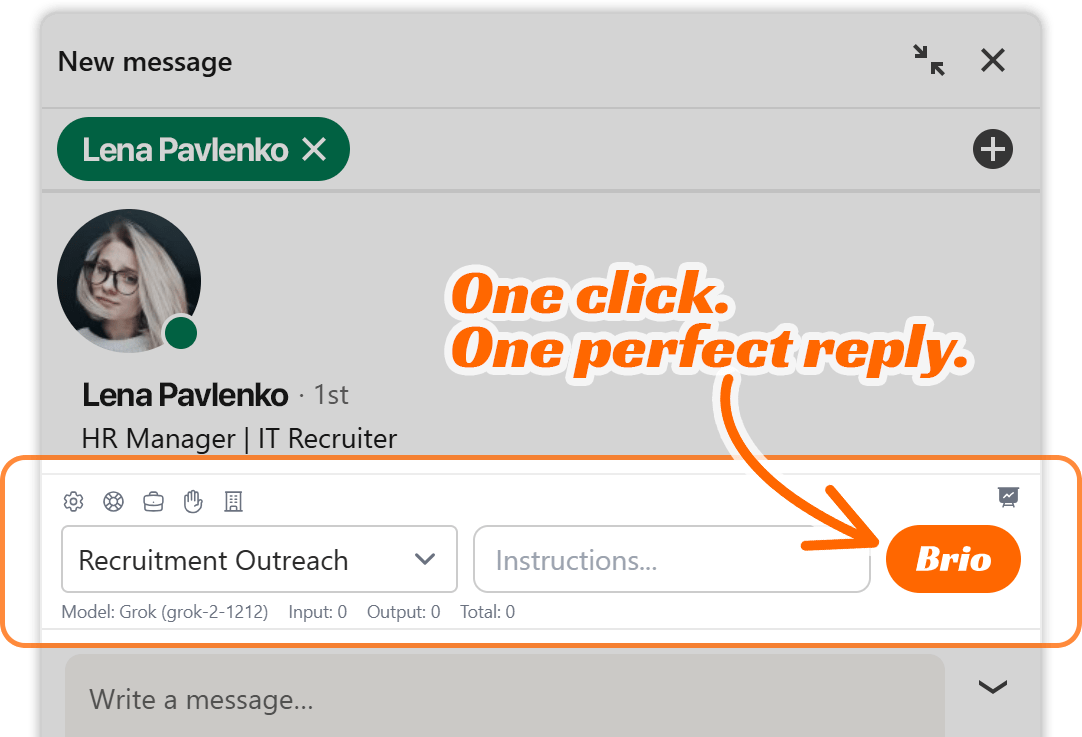
When writing or replying to a LinkedIn message, there’s a dropdown menu at the bottom of the chat interface labeled Engagement Profile. You’ll use this to choose the most relevant profile for the conversation you’re about to generate a response for.
Why It Matters
Brio uses the selected engagement profile to determine how to structure the message, what tone to use, which CTA to prioritize, and what facts to reference. Without this context, the AI won’t know:
- What product or service you’re offering
- What benefits or guarantees to highlight
- What kind of person you’re trying to persuade
- What your call-to-action should be
That’s why choosing the correct profile before generating a response is absolutely essential.
Anatomy of an Engagement Profile
Here’s what a fully configured Engagement Profile might include:
1. Profile Name
This is simply the label you use to identify the profile (e.g., “Recruitment Outreach” or “Hiring Managers DE”).
2. Select API + Model
Choose which language model Brio should use for response generation. For example:
- API: Grok
- Model: Grok-2 1212 (Stable release)
This determines the core engine that will process your instructions and generate content.
3. Call-to-Actions (CTAs)
These are clickable links or instructions that appear in or guide Brio’s generated messages. For example:
- Learn about SkillSeek opportunity: https://skillseek.eu/for-recruiters/
- Become a SkillSeek recruiter: https://skillseek.eu/become-a-recruiter/
- Email me: darius@skillseek.eu
- Call me: +37061395177
Each CTA is evaluated for priority and purpose. Brio uses these to guide conversations based on topic alignment, sentiment, and interest triggers from the recipient.
4. Sales Resources
These are URLs that Brio will analyze behind the scenes to extract:
- Verifiable facts (pricing, guarantees)
- Conceptual insights (core platform benefits)
- Real-world use cases (recruiting scenarios, partner testimonials)
Once added, Brio scrapes and processes the content using a series of AI prompts, storing summaries and methodologies for use during live message generation.
5. Business Overview
This is where you summarize your business model, product benefits, pricing structure, placement process, commission breakdowns, and any key milestones. This field enables Brio to answer questions more confidently and frame your offer in a way that builds trust.
Best Practices for Using Engagement Profiles
- Create multiple profiles if you target different personas (e.g., freelance recruiters, clients, hiring managers).
- Keep the facts updated. If your pricing, refund policy, or guarantee changes, update the Sales Resources or Business Overview.
- Use CTA priority order strategically. Make sure the CTAs you care most about are listed higher in priority to influence how Brio pushes them in conversations.
- Review summaries. After uploading Sales Resources, click “Generate Analysis” to verify that Brio has correctly understood the core facts.
- Give descriptive names so your team can easily select the right one in the LinkedIn chat window.
Example Scenario
Suppose you’re engaging a freelance recruiter in Germany. You select the “Recruitment Outreach” engagement profile, which contains the following:
- Grok-2 model
- CTAs linking to your recruiter opportunity pages
- Sales Resources in English and German
- A business overview stating the €197 refundable membership policy
Now, when you generate a reply to a German recruiter’s question about platform benefits, Brio will:
- Recognize this is a freelancer conversation
- Reference the correct pricing structure
- Prioritize CTAs like “Learn about SkillSeek opportunity”
- Write in a professional tone aligned with recruiter expectations
Without the correct Engagement Profile, Brio might default to vague or unrelated information, weakening your message.
Additional Instructions Field
What Is It?
The Additional Instructions field is a free-text input that allows you to pass custom guidance to Brio before it generates a response. Think of it as a temporary override or enhancement to the selected engagement profile.
This field becomes especially useful when you want Brio to:
- Emphasize or de-emphasize certain CTAs
- Avoid discussing specific topics
- Maintain a shorter or longer tone
- Add follow-up questions
- Address objections in a specific way
It’s your way of “whispering” to the AI right before it speaks.
Where to Find It
In the LinkedIn chat window, just to the right of the Engagement Profile dropdown, you’ll find a text box labeled Instructions…. That’s the Additional Instructions field.
This field is only visible to you and never sent to the recipient. It feeds directly into the prompt Brio sends to the language model and influences the tone, structure, and direction of the message.
Why It Matters
The engagement profile provides a general framework, but the Additional Instructions field lets you customize the output for one particular message. It gives you granular control when:
- A conversation veers off-script
- You need to steer around a recipient’s objections
- You want Brio to take a more confident or gentle tone
- You want to highlight a specific benefit or angle
This flexibility ensures that you remain in full control of the conversation strategy while still benefiting from Brio’s automation.
Sample Use Cases
Example 1: Prioritize refund guarantee
Additional Instructions: “Please emphasize the 60-day refundable membership policy as the main reason to try.”
Example 2: Address delay politely
Additional Instructions: “Apologize for the delay in my reply and show understanding if they’ve moved on.”
Example 3: Keep it short and casual
Additional Instructions: “Use a relaxed tone and keep the message under 4 sentences.”
Example 4: Mention legal and admin support
Additional Instructions: “Mention that we handle all legal paperwork and contracts so they don’t have to.”
Example 5: Ask for a referral
Additional Instructions: “If they’re not interested, ask if they know someone who might be.”
Formatting Tips
- Use complete sentences. Brio understands natural language.
- Be specific. Instead of “focus on benefits,” write “mention the recruiter keeps 50% of placement fees.”
- Use plain language. Technical jargon is unnecessary—Brio interprets instructions best when they’re direct.
- Don’t duplicate the Engagement Profile content. Instructions should complement, not replace, the profile.
When to Use It
Use the Additional Instructions field whenever the context requires a nuance that the Engagement Profile alone can’t provide. For example:
- When a conversation has deviated from your core script
- When replying to objections or questions that require a careful tone
- When you’re experimenting with different CTA orders
- When engaging a particularly valuable lead or hesitant contact
You don’t need to use this field every time, but knowing it’s there lets you adapt to virtually any situation with precision.
Limitations
The Additional Instructions field does not:
- Persist across multiple messages. It only applies to the next generated response.
- Save or store settings per contact. It’s message-specific and needs to be re-entered if reused.
- Override the AI model itself. For deeper changes (e.g., changing from Grok to OpenAI), you’ll need to switch profiles.
Final Tips
- Always double-check which Engagement Profile is selected before generating a message.
- Use the Additional Instructions field for strategic nudges, not for major structural changes.
- Combine both for full control: let the profile guide the message, and let the instructions fine-tune the delivery.
By mastering these two fields, you’ll significantly improve your Brio experience—ensuring every message is aligned with your strategy, persuasive in tone, and directed toward clear, actionable next steps.